Python, Pillowで正方形・円形のサムネイル画像を一括作成
Pythonの画像処理ライブラリPillow(PIL)を使って正方形または円形のサムネイル画像を一括で作成する。
なお、PillowのImageモジュールにthumbnail()というメソッドがあるが、引数で指定したsizeに収まるように画像を縮小するだけなので、ここでは独自の関数を定義する。
以下の内容について説明する。
- 長方形画像を正方形にする方法
- 正方形を切り出す
- 余白を追加して正方形にする
- 正方形画像を円形に切り抜く
- 背景を単色無地にする
- 背景を透過させる
- 一括処理のコード例
Pillow(PIL)のインストール、基本的な使い方などは以下の記事参照。
PILからImage, ImageDraw, ImageFilterモジュールをインポートする。ImageDraw, ImageFilterモジュールは円を描画・加工するために使用する。正方形のサムネイル画像を作成する場合は省略してOK。
一括処理する場合はosとglobもインポートしておく。
このあとの例で使用する画像を開き、最終的に取得したいサムネイル画像の幅(=高さ)を決めておく。
import os
import glob
from PIL import Image, ImageDraw, ImageFilter
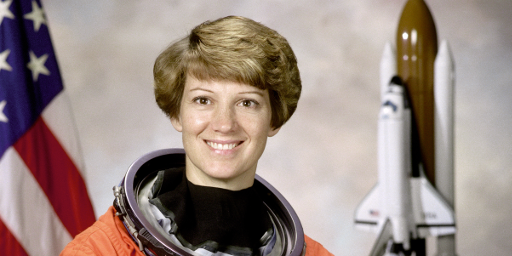
im = Image.open('data/src/astronaut_rect.bmp')
thumb_width = 200
長方形画像を正方形にする方法
長方形画像をPillowのImageモジュールのメソッドresize()で正方形にリサイズするとアスペクト比(縦横比)が変わってしまうため、以下のいずれかの方法を使う。
- 長方形画像から正方形を切り出す
- 長方形画像に余白を追加して正方形にする
一枚の画像を処理する例で、それぞれの方法について説明する。
正方形を切り出す
Imageモジュールのメソッドcrop()で画像の一部の領域を切り出す。
画像の中心の領域を切り出す関数を定義する。
def crop_center(pil_img, crop_width, crop_height):
    img_width, img_height = pil_img.size
    return pil_img.crop(((img_width - crop_width) // 2,
                         (img_height - crop_height) // 2,
                         (img_width + crop_width) // 2,
                         (img_height + crop_height) // 2))
使ってみる。
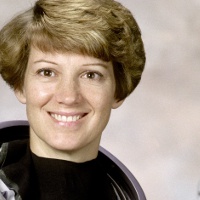
im_thumb = crop_center(im, thumb_width, thumb_width)
im_thumb.save('data/dst/astronaut_thumbnail_center_square.jpg', quality=95)
サムネイルサイズの領域を切り抜くのではなく、最大サイズの正方形(=長方形の短辺サイズの正方形)を切り出して、最後に縮小する方式も考えられる。
最大サイズの正方形を切り出す関数を定義。画像の中心の領域を切り出す関数を使っている。
def crop_max_square(pil_img):
    return crop_center(pil_img, min(pil_img.size), min(pil_img.size))
使ってみる。長方形画像を正方形にしたあと、所望のサムネイル画像のサイズにresize()で縮小している。
im_thumb = crop_max_square(im).resize((thumb_width, thumb_width), Image.LANCZOS)
im_thumb.save('data/dst/astronaut_thumbnail_max_square.jpg', quality=95)
余白を追加して正方形にする
元の長方形画像全体を残したい場合は、上下あるいは左右に余白を追加して正方形にする。
Imageモジュールのメソッドnew()で単色無地の画像(ベタ画像)を生成し、paste()で元画像を貼り付けるという流れ。
最終的に長方形の長辺のサイズの正方形になるように余白を追加する関数を定義する。
def expand2square(pil_img, background_color):
    width, height = pil_img.size
    if width == height:
        return pil_img
    elif width > height:
        result = Image.new(pil_img.mode, (width, width), background_color)
        result.paste(pil_img, (0, (width - height) // 2))
        return result
    else:
        result = Image.new(pil_img.mode, (height, height), background_color)
        result.paste(pil_img, ((height - width) // 2, 0))
        return result
使ってみる。長方形画像を正方形にしたあと、所望のサムネイル画像のサイズにresize()で縮小している。
im_thumb = expand2square(im, (0, 0, 0)).resize((thumb_width, thumb_width), Image.LANCZOS)
im_thumb.save('data/dst/astronaut_thumbnail_expand.jpg', quality=95)

正方形画像を円形に切り抜く
円形のサムネイル画像を生成したい場合は、正方形からさらに円形に切り抜く。
円形で切り抜いた背景を単色無地(白や黒)にする方法と、透過させる(透過pngにする)方法を説明する。
背景を単色無地にする
二枚の画像をマスク画像に従って合成する、Imageモジュールのメソッドcomposite()を使う。
円を描画してマスク画像とする。図形描画についての詳細は以下の記事参照。
所望の背景色の単色無地画像をnew()で生成して、円形マスクで正方形画像と合成する。
ImageFilterでマスク画像をぼかすと境界がなめらかになる。ぼかすと円の領域が広がるので、最初に円を描画する際に小さめにしておく必要がある。
以下のような関数を定義。背景色background_color、ぼかす範囲の大きさblur_radius、オフセットoffsetを指定する。blur_radius=0でぼかし無し。
def mask_circle_solid(pil_img, background_color, blur_radius, offset=0):
    background = Image.new(pil_img.mode, pil_img.size, background_color)

    offset = blur_radius * 2 + offset
    mask = Image.new("L", pil_img.size, 0)
    draw = ImageDraw.Draw(mask)
    draw.ellipse((offset, offset, pil_img.size[0] - offset, pil_img.size[1] - offset), fill=255)
    mask = mask.filter(ImageFilter.GaussianBlur(blur_radius))

    return Image.composite(pil_img, background, mask)
使ってみる。
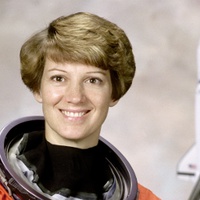
im_square = crop_max_square(im).resize((thumb_width, thumb_width), Image.LANCZOS)
im_thumb = mask_circle_solid(im_square, (0, 0, 0), 4)
im_thumb.save('data/dst/astronaut_thumbnail_mask_circle_solid.jpg', quality=95)

背景を透過させる
画像にアルファチャンネルを追加する、Imageモジュールのメソッドputalpha()を使う。
流れは単色無地を背景とする場合と同じ。
def mask_circle_transparent(pil_img, blur_radius, offset=0):
    offset = blur_radius * 2 + offset
    mask = Image.new("L", pil_img.size, 0)
    draw = ImageDraw.Draw(mask)
    draw.ellipse((offset, offset, pil_img.size[0] - offset, pil_img.size[1] - offset), fill=255)
    mask = mask.filter(ImageFilter.GaussianBlur(blur_radius))

    result = pil_img.copy()
    result.putalpha(mask)

    return result
透過画像はpngで保存する。
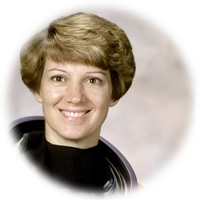
im_square = crop_max_square(im).resize((thumb_width, thumb_width), Image.LANCZOS)
im_thumb = mask_circle_transparent(im_square, 4)
im_thumb.save('data/dst/astronaut_thumbnail_mask_circle_transparent.png')
一括処理のコード例
任意のディレクトリ(フォルダ)内の画像ファイルからサムネイル画像を一括で作成する。
ファイル名の一括変換や画像の一括リサイズとほぼ同じ要領でできる。
src_dirにある画像ファイルのサムネイル画像を生成し、dst_dirに保存する例は以下の通り。
src_dir = 'data/temp/src'
dst_dir = 'data/temp/dst'

files = glob.glob(os.path.join(src_dir, '*.jpg'))

for f in files:
    im = Image.open(f)
    im_thumb = crop_max_square(im).resize((thumb_width, thumb_width), Image.LANCZOS)
    ftitle, fext = os.path.splitext(os.path.basename(f))
    im_thumb.save(os.path.join(dst_dir, ftitle + '_thumbnail' + fext), quality=95)