Alpha blending and masking of images with Python, OpenCV, NumPy
Performs alpha blending and masking with Python, OpenCV, NumPy.
It can be realized with only NumPy without using OpenCV. Because NumPy's array operation is easier and more flexible, I recommend it.
This article describes the following contents.
- Alpha blending with OpenCV:
cv2.addWeighted() - Masking with OpenCV:
cv2.bitwise_and() - Alpha blending with NumPy
- Masking with NumPy
- Complex alpha blending and masking with NumPy
- Mask image creation by OpenCV drawing
Refer to the following article about alpha blending and masking using Pillow (PIL).
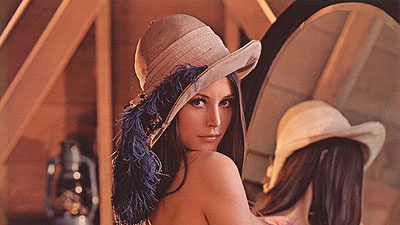
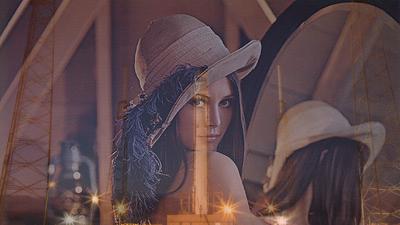
The sample code uses the following image.
OpenCV version of sample code is 4.0.1. OpenCV3 and 4 should not change much, but OpenCV2 may be different, so be careful.
Alpha blending with OpenCV: cv2.addWeighted()
Use cv2.addWeighted() to do alpha blending with OpenCV.
dst = cv2.addWeighted(src1, alpha, src2, beta, gamma[, dst[, dtype]])
It is calculated as follows according to parameters.
dst = src1 * alpha + src2 * beta + gamma
The two images need to be the same size, so resize them.
import cv2
src1 = cv2.imread('data/src/lena.jpg')
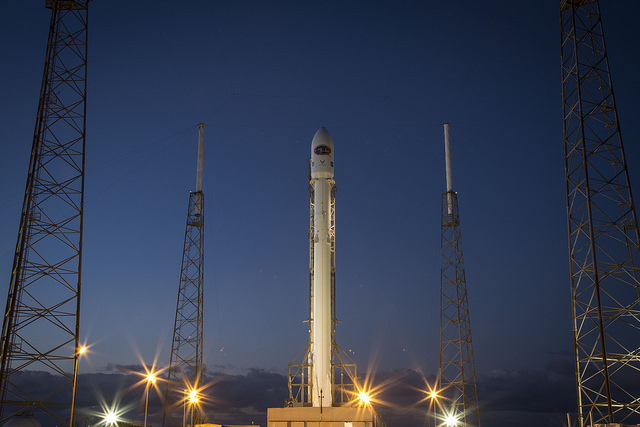
src2 = cv2.imread('data/src/rocket.jpg')
src2 = cv2.resize(src2, src1.shape[1::-1])
Refer to the following article for obtaining the size of the image read as NumPy array ndarray.
The image is alpha blended according to the second parameter alpha and the fourth parameter beta.
Although images are saved as files here, if you want to display them in another window, you can use cv2.imshow() (e.g.: cv2.imshow('window_name', dst)). The same is true for the following sample code.
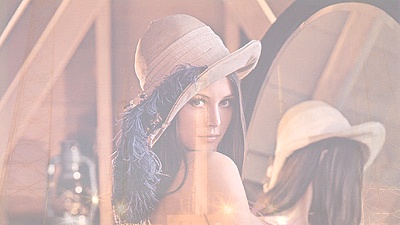
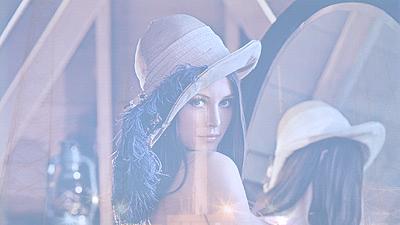
dst = cv2.addWeighted(src1, 0.5, src2, 0.5, 0)

cv2.imwrite('data/dst/opencv_add_weighted.jpg', dst)

The fifth parameter gamma is the value to be added to all pixel values.
dst = cv2.addWeighted(src1, 0.5, src2, 0.2, 128)

cv2.imwrite('data/dst/opencv_add_weighted_gamma.jpg', dst)
As you can see from the above result, it does not overflow even if it exceeds the maximum value (255 for uint8), but it is noted that some data types may not be handled properly.
In such a case, use clip() method of ndarray. See the section on alpha blending with NumPy below.
Masking with OpenCV: cv2.bitwise_and()
Use cv2.bitwise_and() to do masking with OpenCV.
dst = cv2.bitwise_and(src1, src2[, dst[, mask]])
cv2.bitwise_and() is a function that performs bitwise AND processing as the name suggests. The AND of the values for each pixel of the input images src1 and src2 is the pixel value of the output image.
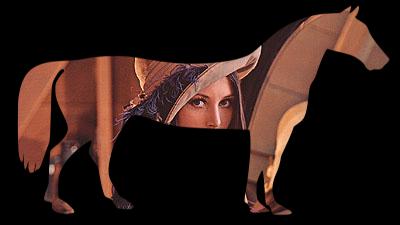
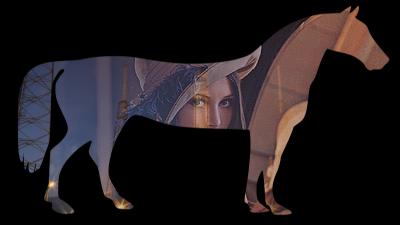
Here, a grayscale image is used as a mask image for src2.
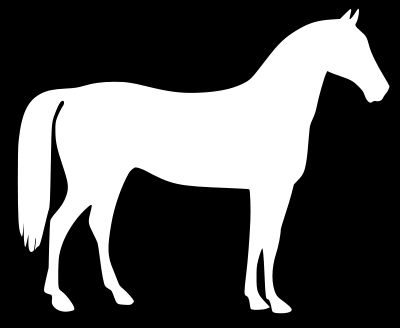
src2 = cv2.imread('data/src/horse_r.png')

src2 = cv2.resize(src2, src1.shape[1::-1])

print(src2.shape)
# (225, 400, 3)

print(src2.dtype)
# uint8

dst = cv2.bitwise_and(src1, src2)

cv2.imwrite('data/dst/opencv_bitwise_and.jpg', dst)

When the image file is read, the data type is uint8 (unsigned 8-bit integer: 0-255), black indicates pixel value 0 (0b00000000 in binary), white indicates pixel value 255 (0b11111111 in binary) ).
In the case of uint8, the result of the bit operation is easy to understand, but in the case of the floating point number float, it is noted that the bit operation is performed in binary notation, and the result is unexpected.
It may be easier to understand the mask processing with NumPy described later.
In addition to cv2.bitwise_and(), OpenCV also includes cv2.bitwise_or(), cv2.bitwise_xor() and cv2.bitwise_not() for performing OR, XOR and NOT operation.
Alpha blending with NumPy
Since NumPy can easily perform arithmetic operations for each pixel of the array, alpha blending can also be realized with a simple expression.
Here, image files are read as NumPy array ndarray using Pillow. Resize is also done by the method of Pillow.
Image files are read as ndarray with OpenCV's cv2.imread(), so it doesn't matter which OpenCV or Pillow is used, but be aware that the color order is different.
Since the operation of ndarray and scalar value is the operation of the value of each element and the scalar value, alpha blend can be calculated as follows. Be careful when saving as an image file with Pillow because the data type is cast automatically.
import numpy as np
from PIL import Image

src1 = np.array(Image.open('data/src/lena.jpg'))
src2 = np.array(Image.open('data/src/rocket.jpg').resize(src1.shape[1::-1], Image.BILINEAR))

print(src1.dtype)
# uint8

dst = src1 * 0.5 + src2 * 0.5

print(dst.dtype)
# float64

Image.fromarray(dst.astype(np.uint8)).save('data/dst/numpy_image_alpha_blend.jpg')
Note that when saving as a jpg file with the save() method of Pillow, you can specify the quality with the argument quality (it is omitted in the example, so it remains the default).
It is also easy if you want to add values to each pixel uniformly, like the parameter gamma in OpenCV's cv2.addWeighted(). Different values can be added to each color as follows. As mentioned above, note that the color order differs depending on how the image file is read.
Use clip() to clip pixel values to the range 0 to 255. Note that unexpected results occur when saving as an image file if there is a value exceeding the maximum value 255 of uint8.
dst = src1 * 0.5 + src2 * 0.2 + (96, 128, 160)

print(dst.max())
# 311.1

dst = dst.clip(0, 255)

print(dst.max())
# 255.0

Image.fromarray(dst.astype(np.uint8)).save('data/dst/numpy_image_alpha_blend_gamma.jpg')
Masking with NumPy
Masking is easy with NumPy's array operations.
The arithmetic operations of arrays of the same shape are operations for each pixel at the same position.
The grayscale image read as uint8 has 0 for black and 255 for white. By dividing this by 255, black becomes 0.0 and white becomes 1.0, and by multiplying this with the original image, only the white 1.0 part remains, and the mask processing can be realized.
import numpy as np
from PIL import Image

src = np.array(Image.open('data/src/lena.jpg'))
mask = np.array(Image.open('data/src/horse_r.png').resize(src.shape[1::-1], Image.BILINEAR))

print(mask.dtype, mask.min(), mask.max())
# uint8 0 255

mask = mask / 255

print(mask.dtype, mask.min(), mask.max())
# float64 0.0 1.0

dst = src * mask

Image.fromarray(dst.astype(np.uint8)).save('data/dst/numpy_image_mask.jpg')
In this example, if dst = src * mask / 255,src * mask is first calculated as uint8, and the value is rounded and then divided by 255, which is not the expected result.
It is OK if dst = src * (mask / 255) or dst = mask / 255 * src.
If you do not want to consider the order, you can cast all arrays to float and then operate. There may be fewer mistakes.
Be careful if the mask image is a grayscale image and a 2D (no color dimension) ndarray. If multiplication is performed as it is, an error occurs.
mask = np.array(Image.open('data/src/horse_r.png').convert('L').resize(src.shape[1::-1], Image.BILINEAR))

print(mask.shape)
# (225, 400)

mask = mask / 255

# dst = src * mask
# ValueError: operands could not be broadcast together with shapes (225,400,3) (225,400)
NumPy has a mechanism called broadcast that performs operations by automatically converting arrays of different dimensions and shapes as appropriate. However, according to the error message, broadcasting is not appropriately performed by the combination of the above examples.
It will broadcast well if you add one more dimension to a 2D ndarray.
mask = mask.reshape(*mask.shape, 1)

print(mask.shape)
# (225, 400, 1)

dst = src * mask

Image.fromarray(dst.astype(np.uint8)).save('data/dst/numpy_image_mask_l.jpg')
shape of the original array is unpacked and passed to reshape().
- NumPy: How to use reshape() and the meaning of -1
- Unpack and pass list, tuple, dict to function arguments in Python
Another way is to use np.newaxis instead of reshape().
# mask = mask[:, :, np.newaxis]
Complex alpha blending and masking with NumPy
In the example of the alpha blend above, the image was composited at a uniform ratio over the entire surface of the image, but using NumPy, it is possible to composite based on another image (array).
Use the following gradation image. Gradation images can be generated using NumPy.

It can be composited by a simple operation. An image is generated in which the alpha value (blending ratio) changes according to the pixel value of the gradation image.
import numpy as np
from PIL import Image

src1 = np.array(Image.open('data/src/lena.jpg'))
src2 = np.array(Image.open('data/src/rocket.jpg').resize(src1.shape[1::-1], Image.BILINEAR))

mask1 = np.array(Image.open('data/src/gradation_h.jpg').resize(src1.shape[1::-1], Image.BILINEAR))

mask1 = mask1 / 255

dst = src1 * mask1 + src2 * (1 - mask1)

Image.fromarray(dst.astype(np.uint8)).save('data/dst/numpy_image_ab_grad.jpg')
It is also easy if you want to mask with another image.
mask2 = np.array(Image.open('data/src/horse_r.png').resize(src1.shape[1::-1], Image.BILINEAR))

mask2 = mask2 / 255

dst = (src1 * mask1 + src2 * (1 - mask1)) * mask2

Image.fromarray(dst.astype(np.uint8)).save('data/dst/numpy_image_ab_mask_grad.jpg')
Mask image creation by OpenCV drawing
Geometric mask images can be created using the OpenCV drawing function.
It is possible to generate a ndarray of the same shape as the image to be processed by np.zeros_like() and in which all elements are 0. It corresponds to a black image of the same size as the original image.
import cv2
import numpy as np

src = cv2.imread('data/src/lena.jpg')

mask = np.zeros_like(src)

print(mask.shape)
# (225, 400, 3)

print(mask.dtype)
# uint8
You can also specify size with np.zeros().
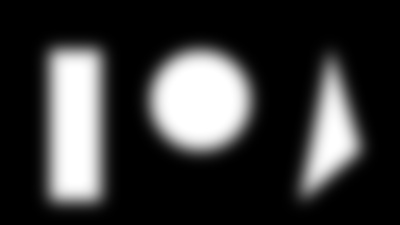
Here, draw figures with the drawing function of OpenCV. A rectangle uses cv2.rectangle(), a circle uses cv2.circle(), and a polygon uses cv2.fillConvexPoly(). Rectangles and circles will be filled if thickness=-1.
cv2.rectangle(mask, (50, 50), (100, 200), (255, 255, 255), thickness=-1)
cv2.circle(mask, (200, 100), 50, (255, 255, 255), thickness=-1)
cv2.fillConvexPoly(mask, np.array([[330, 50], [300, 200], [360, 150]]), (255, 255, 255))

cv2.imwrite('data/dst/opencv_draw_mask.jpg', mask)

When smoothing (blurring) processing is performed using a function such as cv2.GaussianBlur(), the boundary becomes smooth, so that it is possible to perform smooth synthesis by masking.
Specify the kernel size in the x and y direction as a tuple in the second parameter of cv2.GaussianBlur(). As each value is increased, the blurring width in that direction is increased. The value needs to be odd. The third parameter specifies the Gaussian standard deviation value. If it is 0, it is calculated automatically. Note that it cannot be omitted.
For other smoothing functions, refer to the official document below.
mask_blur = cv2.GaussianBlur(mask, (51, 51), 0)

cv2.imwrite('data/dst/opencv_draw_mask_blur.jpg', mask_blur)
dst = src * (mask_blur / 255)

cv2.imwrite('data/dst/opencv_draw_mask_blur_result.jpg', dst)
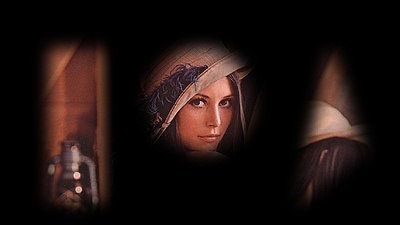
Note that if the part dst = src * (mask_blur / 255) is dst = src * mask_blur / 255, the result will not be as expected. See Masking with NumPy section.
Also, if the ndarray used as a mask is a two-dimensional array (no color dimension), it cannot be calculated without adding one more dimension. See also Masking with NumPy section.